Convert your Next.js Site in multiple language with ease.
Introduction:
We are going to use Bilingual (opens in a new tab) which will assist us to translate our website easily and seamlessly with few commands with the professional and more accurate translation services. Deepl Pro, Google Cloud Translation (Pro) and Bilingual (translation model).
Bilingual offers beautiful dashboard where you can verify the translated text, SDK’s for different languages and RestAPI so you can easily integrate with any of the frameworks or languages that you prefer.
Why bilingual?
Bilingual offers professional versions of all translation with proper accuracy check which result 90% accuracy on the translation. Additionally it helps you to reduce more than 70% of your cost and effort on development with seamless command line and SDK’s. If you want to hire a human translator as well, bilingual with reduce about 90% of the work of the human translator as his job will be only to review and approve.
Let’s start.
Today I would like to present how we can integrate bilingual in your next.js (App Router) project.
At first, Let’s create a next.js project.
To create a next js project. you can run.
To install Next.js 14, you can run the following command in your terminal:
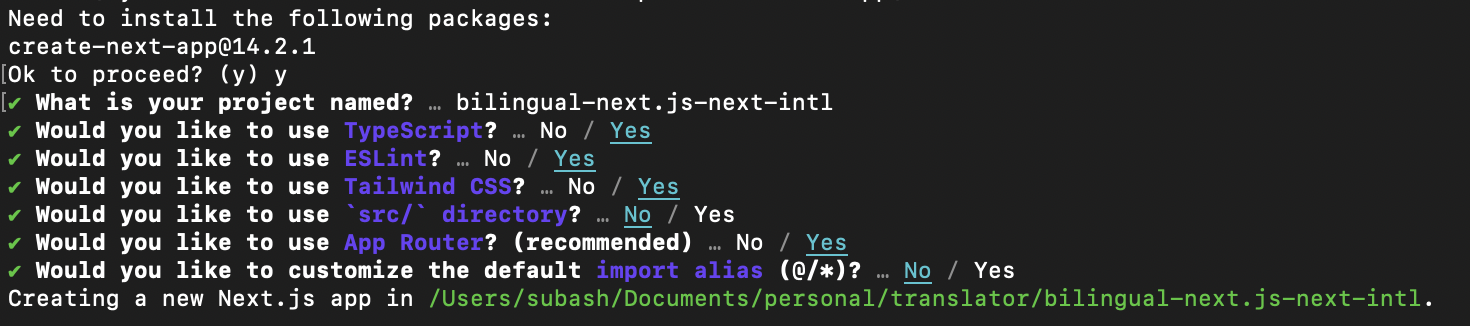
npx create-next-app@latestOn installation you will see following prompts
What is your project named? my-app
Would you like to use TypeScript? No / Yes
Would you like to use ESLint? No / Yes
Would you like to use Tailwind CSS? No / Yes
Would you like to use `src/` directory? No / Yes
Would you like to use App Router? (recommended) No / Yes
Would you like to customize the default import alias (@/*)? No / Yes
What import alias would you like configured? @/*
You can configure it as per your preference.
Here is my configuration
Now move to the directory of our newly created and install next-intl and Bilingual-ts package which will help us to integrate our translation easily. To install, Run:
cd path/to/your-project-directory
npm install next-intl bilingual-ts
Ok we have successfully installed the packages that are required to initialize the project.
Let’s open on your favorite code editor. In my case, I am using vs-code, to open I will run
code .Middleware and configuration.
Now, set up the plugin which creates an alias to provide your i18n configuration (specified in the next step) to Server Components.
You can get detailed information here on official documentation of next-intl (opens in a new tab) .
To do, write following code in next.config.mjs .
import createNextIntlPlugin from 'next-intl/plugin';

const withNextIntl = createNextIntlPlugin();

/** @type {import('next').NextConfig} */
const nextConfig = {};

export default withNextIntl(nextConfig);
If you are using common js, import statement will not work. Use following configuration.
const createNextIntlPlugin = require('next-intl/plugin');

const withNextIntl = createNextIntlPlugin();

/** @type {import('next').NextConfig} */
const nextConfig = {};

module.exports = withNextIntl(nextConfig);
next-intl creates a configuration once per request. Here you can provide messages and other options depending on the locale of the user.
Let’s create a i18n.ts file on the root directory. Where we can configure our languages for server and client.
import {notFound} from 'next/navigation';
import {getRequestConfig} from 'next-intl/server';

// Can be imported from a shared config
const locales = ['en', 'de'];

export default getRequestConfig(async ({locale}) => {
  // Validate that the incoming `locale` parameter is valid
  if (!locales.includes(locale as any)) notFound();

  return {
    messages: (await import(`../locales/${locale}.json`)).default
  };
});
Now, We need to setup the middleware to handle the locales for the request and redirects or rewrites acordingly.
create middleware.ts on the root directory of the project and write following code.
import createMiddleware from 'next-intl/middleware';

export default createMiddleware({
  // A list of all locales that are supported
  locales: ['en', 'de'],

  // Used when no locale matches
  defaultLocale: 'en'
});

export const config = {
  // Match only internationalized pathnames
  matcher: ['/', '/(de|en)/:path*']
}
If you are not aware of next.js middleware, please check here. https://nextjs.org/docs/app/building-your-application/routing/middleware (opens in a new tab)
File Based Routing
As well all know, Next.js offers file based routing, so, let’s create [locale] directory inside app directory and configure the html language dynamically in layout.tsx
Let’s ,move our existing layout.tsx and page.tsx inside [locale] directory.
Now the directory should look like this.
app/[locale]/layout.tsx
app/[locale]/page.tsx
As Next.js supports file based routing, now we can easily get our current locale on the params. Let’s change the layout.tsx a little bit.
export default function LocaleLayout({
  children,
  params: {locale}
}: {
  children: React.ReactNode;
  params: {locale: string};
}) {
  return (
    <html lang={locale}>
      <body>{children}</body>
    </html>
  );
}
So, we have got the current locale from the param and set the <html lang={locale} so browser can understand the current locale.
Similarly let’s use the locales in page.tsx as well.
import {useTranslations} from 'next-intl';

export default function Index() {
  const t = useTranslations('Index');
  return <h1>{t('title')}</h1>;
}
We have completed the initial setup of the next-intl , now Let’s set up Bilingual (opens in a new tab) to translate your texts automatically, push to translate and get the translated texts.
To do, Sign Up (opens in a new tab) in Bilingual (opens in a new tab) , purchase the characters you might need or start a free trial.
After successful trial, you will be redirected to the project page, where you can create a new project.
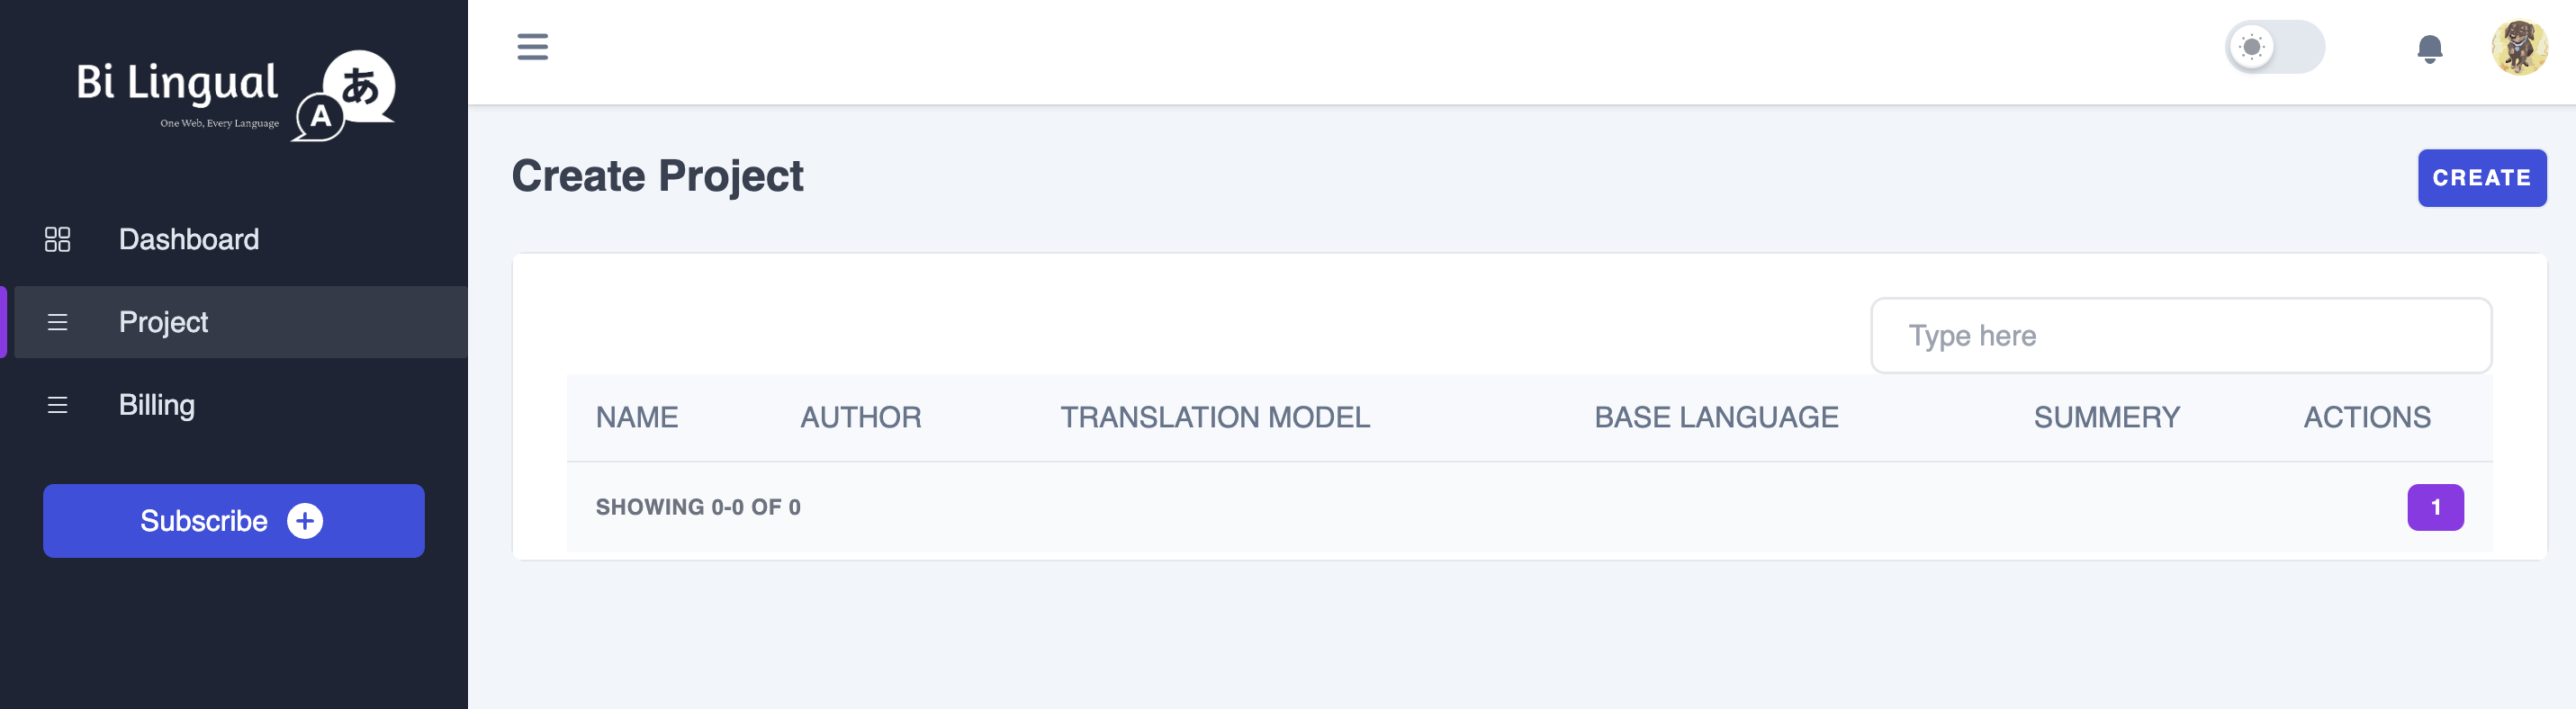
You can create the project by clicking create button on top right corner, you can fill up the form with Project Name (Name of your project), Translation Model( if you are in trial you can only use Bilingual) and the language( The language you want to translate from) and description( it is optional, if you want to have any and submit the form.
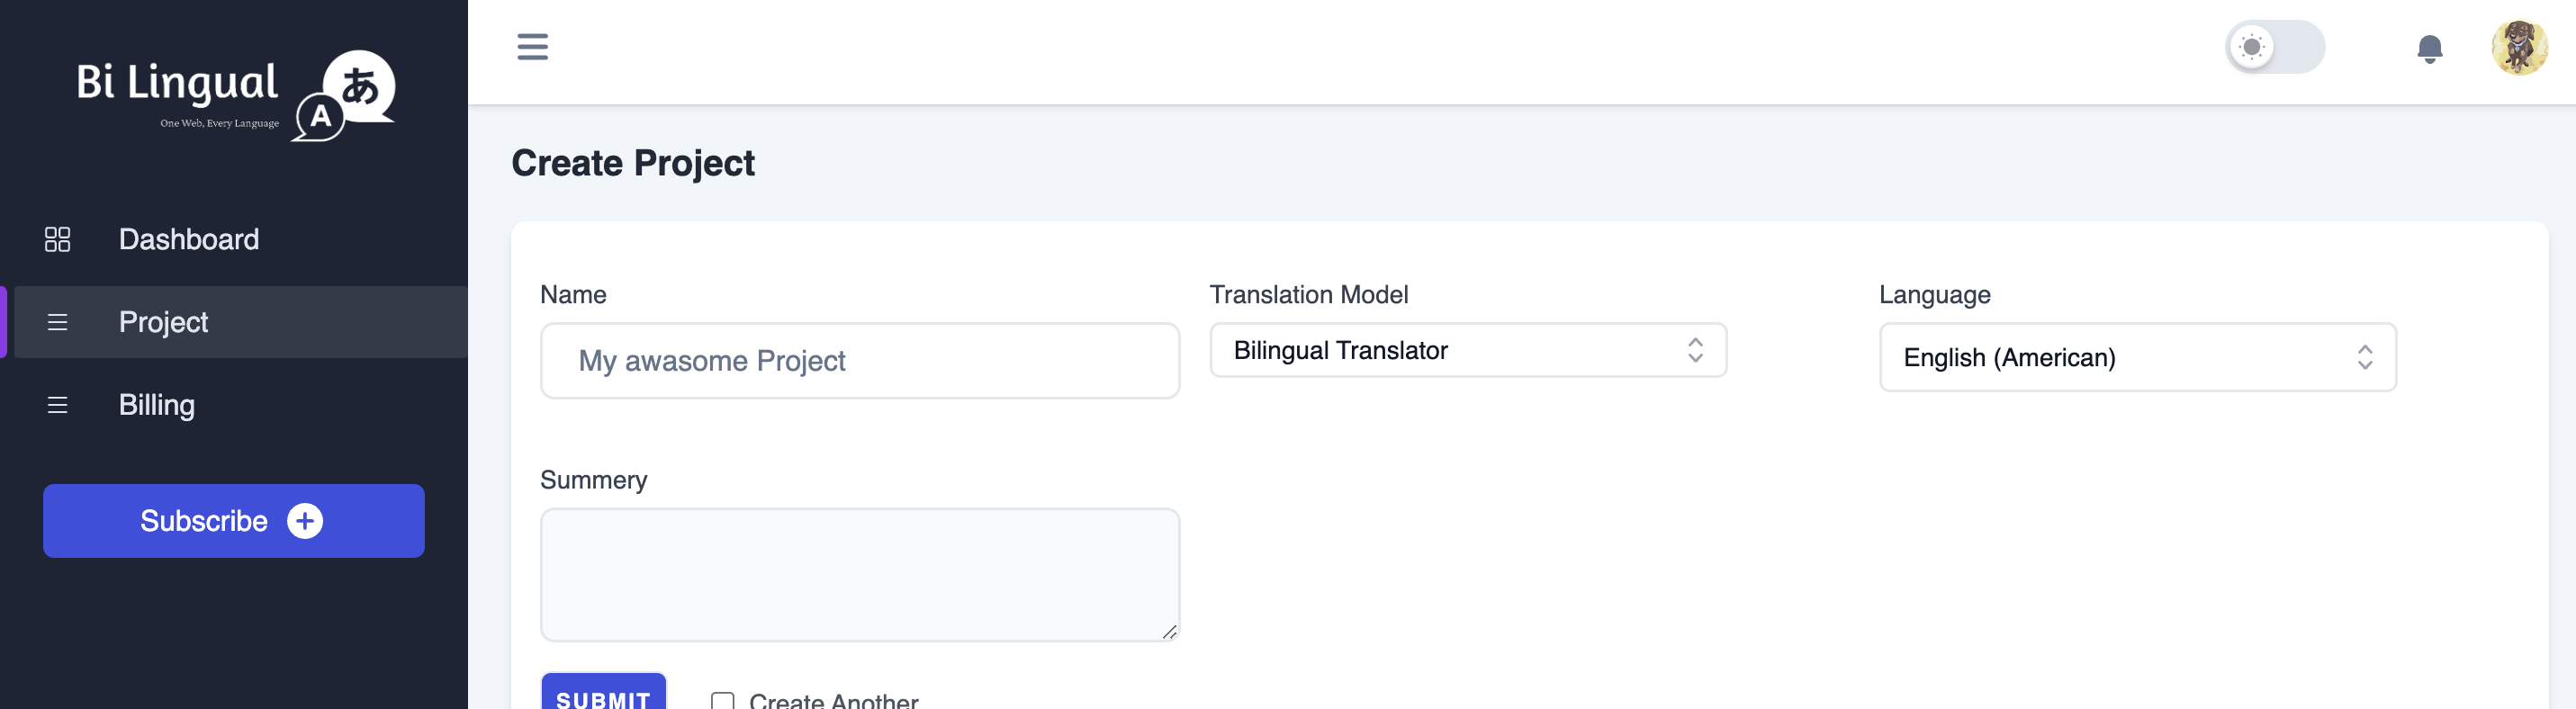
Once you submit the form you will be redirected to the project page, where you can add your translation language, or click on the base language where you can add the texts that you want to translate.
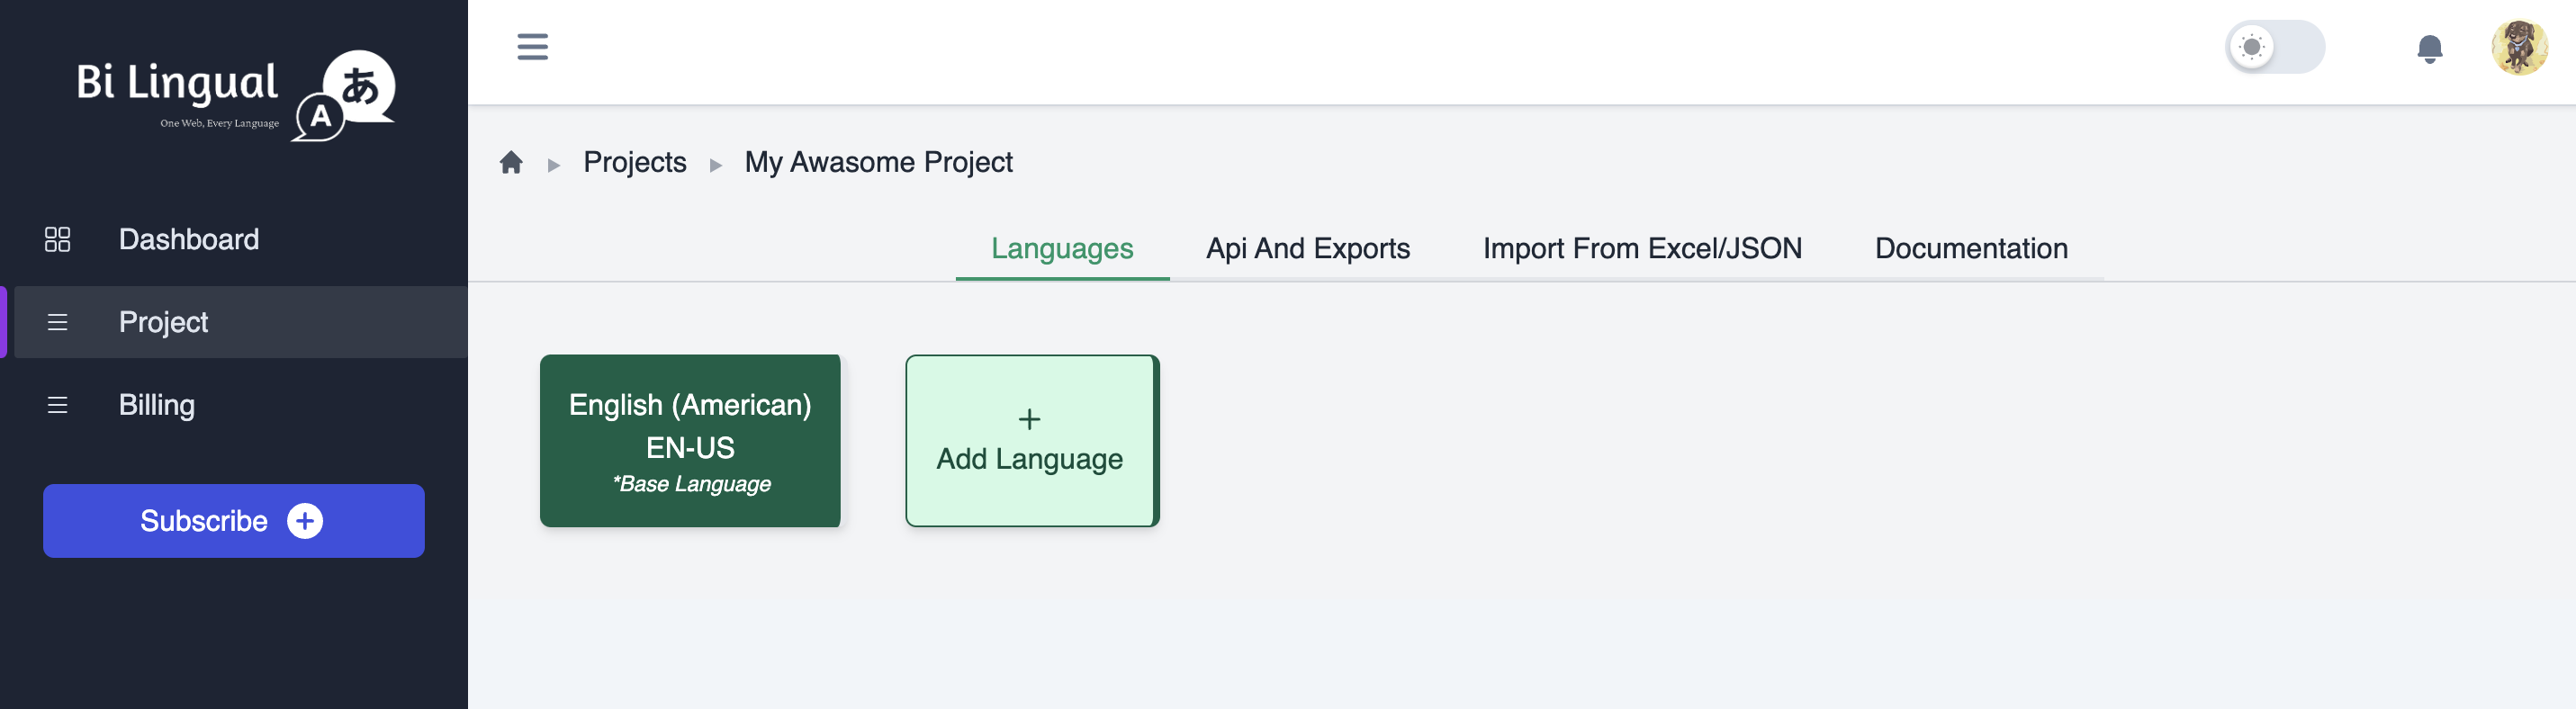
Here you can add language on which you want to translate your texts. And To add the texts, you can click on the base Language, then you will be redirected to the page where you can add the source text, which will be translated and validated with AI engine in the background.
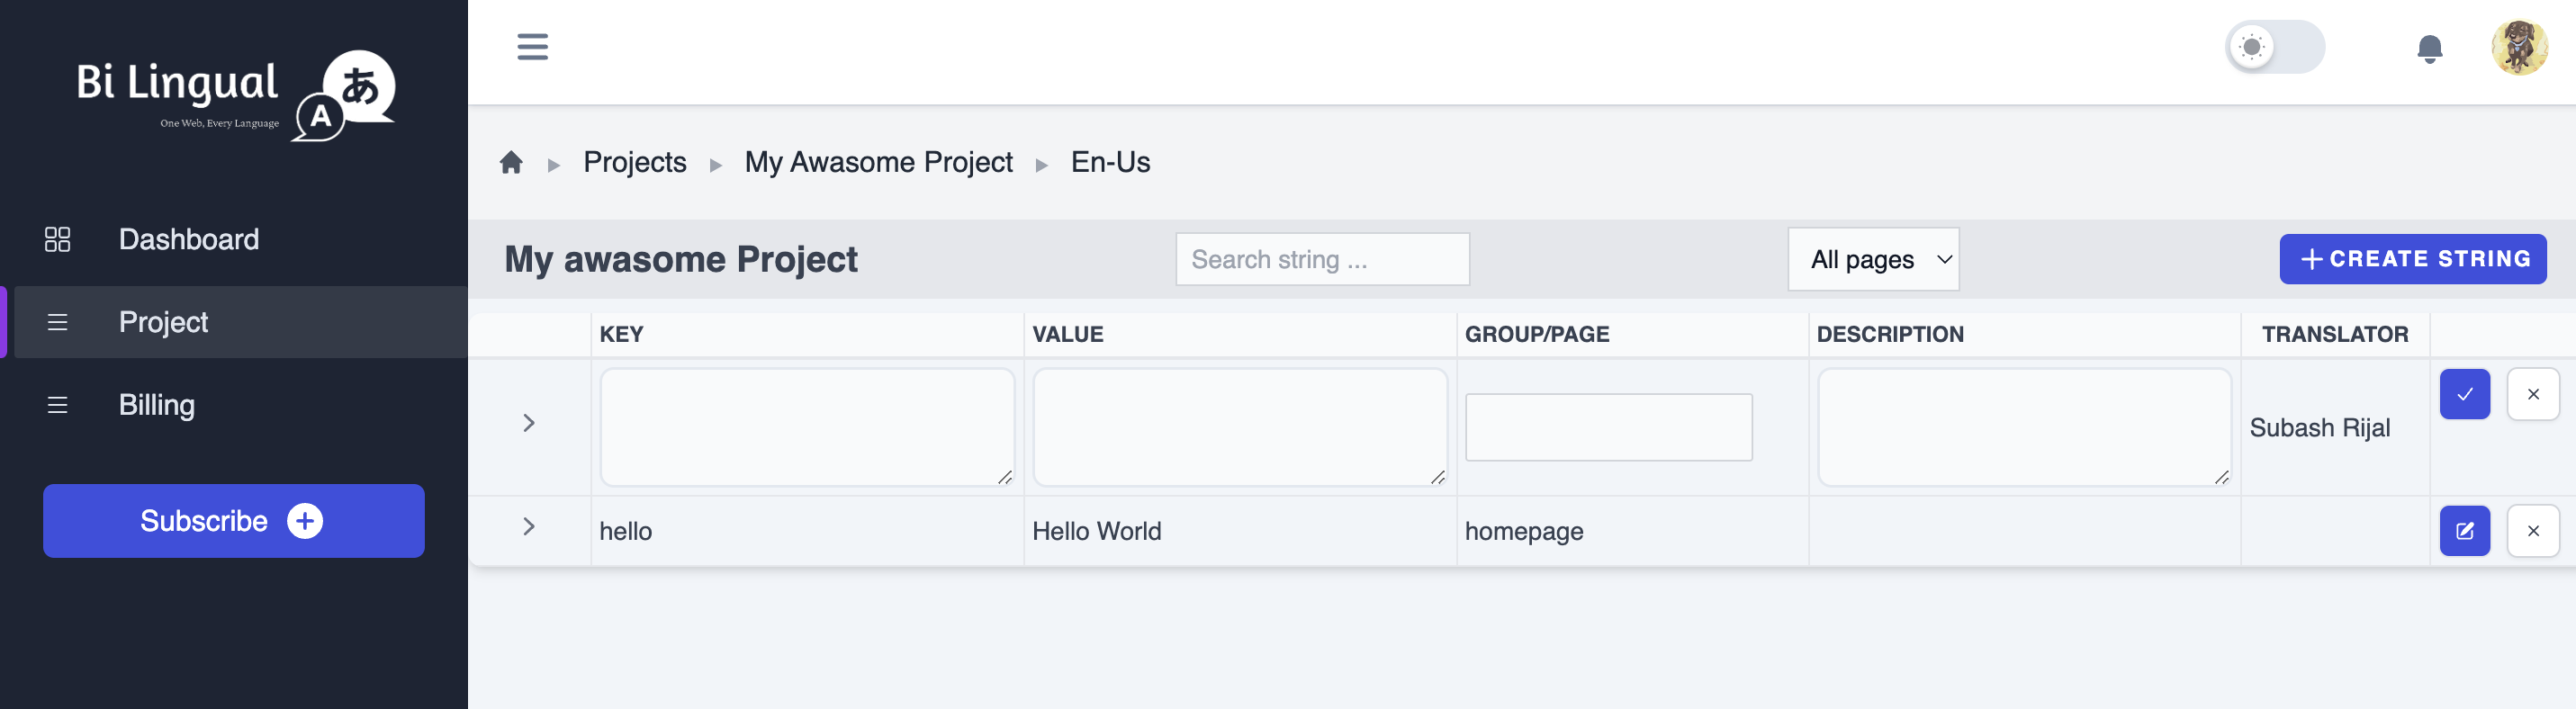
Or you can import from the Json, Csv or Excel. To import you can jump to the Import/Export tab on the project page, download the sample to check the supported format. edit it and upload it to import the texts in bulk.

Additionally, you can post the existing json from the codebase with the command line tool. To do that, let’s create the Authentication Key for the project, To create the Authentication code, go to Api and Exports tab on the Project page, Generate the Api key, with the name and the expiry Date ( If you leave empty, It will Never expires). Also do not share the key with anyone.
Once you created the Project Key, You can go back to the code
Setup Project Key And locales base Directory
As we already have installed javascript library for the bilingual-ts previously. Now we need to set up environment variable to provide Project Key, Locales Base Directory etc.
Let’s create a .env on our root Directory and Add our environment variables.
BILINGUAL_API_KEY=Your APi Key
LOCALE_BASE_PATH="locales"
LANGUAGE_CODE_MAP="en:en-us,jp:ja"
Here, you may not understand the LANGUAGE_CODE_MAP key, It is optional.
Some time supported language code of the Bilingual might be different then the language code of your locale environment, at that time, you can map your language code as shown in example above, where you can map multiple language codes comma separated.
On example en:en-us en (Left side) represents the local directory name or language code and en-us is Bilingual Language code.
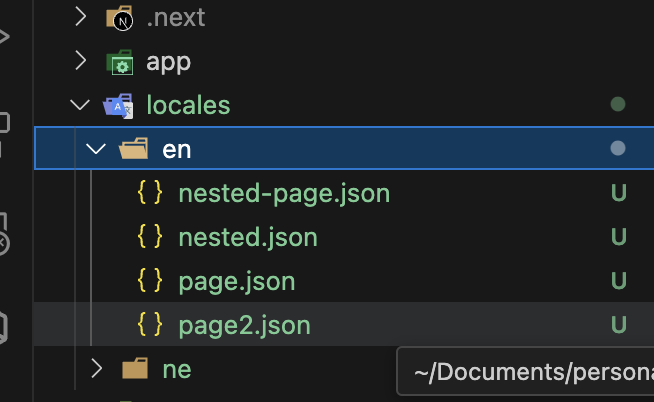
Now finally let’s create a locales directory which is our base directory to store the translation data.
Now., to get the translated languages from bilingual, you can Run,
npx get-translatednow you can see the files inside the locales folder.
Additionally. if You want to push the new files to the server for translation,
You can change the json files, create new page and add more json,
The you can run,
npx push-localesWhich will push your all of the newly added Json. files to the server.
After few seconds or minutes, your translation and verification process will be completed.,
So you can again run npx get-translated to get the translated languages.
Now, you can seamlessly, add update, push to server and get from the servers with single commands.
If you get any issues, please try to contact us on